Introduction
If you are learning game development in Unity, one of the most important systems you will ever build is an inventory system ( Unity 6 Inventory System Tutorial ).
Almost every game today, whether it is an RPG, survival game, adventure game, or even a shooter, uses some form of inventory system.
In this Unity 6 Inventory System Tutorial, you will learn how to create a fully functional and beginner-friendly inventory system from scratch.

We will cover everything step by step, including item creation, UI design, adding and removing items, and testing your system.
This tutorial is designed for beginners, so even if you have basic knowledge of Unity and C#, you will be able to follow along easily ( Unity 6 Inventory System Tutorial ).
By the end of this guide, you will have your own working inventory system that you can expand into a full game system.
What is an Inventory System in Unity?
An inventory system is a game mechanic that allows players to:
- Collect items
- Store items
- Use items later
- Manage resources efficiently
In Unity, an inventory system is usually built using:
- C# Scripts
- UI System (Canvas, Panels, Buttons)
- Data structures like Lists or Arrays
A good inventory system is the backbone of many successful games. Without it, most games feel incomplete or unprofessional.
Why Inventory Systems Are Important in Games
Inventory systems are not just a feature; they are a core gameplay mechanic.
Here’s why they are important:
RPG Games
Players collect weapons, armor, and potions.
Survival Games
Players store food, tools, and resources.
Adventure Games
Players collect keys, artifacts, and quest items.
Shooter Games
Players manage ammo, guns, and equipment.
Without an inventory system, your game cannot provide progression or player engagement.
Prerequisites (Before You Start)
Before starting this Unity 6 Inventory System Tutorial, make sure you have:
Unity 6 installed
Basic understanding of C#
Basic knowledge of the Unity UI system
A new Unity 2D or 3D project
If you are completely new, don’t worry, this tutorial is beginner-friendly.
Step 1: Setting Up Unity Project
First, open Unity Hub and create a new project:
Steps:
1. Click “New Project”
2. Select 2D or 3D Template
3. Name it: InventorySystemProject.
4. Click Create
Now create folders to keep your project organized:
* Scripts
* UI
* Prefabs
* Items
Good project structure = professional development workflow
Step 2: Creating Item System (Scriptable Objects)
We will use Scriptable Objects to create reusable items.
Why Scriptable Objects?
They allow you to create multiple items without duplicating code.
Item Script:
using UnityEngine;
[CreateAssetMenu(fileName = "New Item", menuName = "Inventory/Item")]
public class Item : ScriptableObject
{
public string itemName;
public Sprite itemIcon;
public bool isStackable;
}
What this does:
- Creates item data (name, icon, stackable option)
- Lets you create items directly in Unity editor
Now you can create items like:
- Sword
- Potion
- Key
- Coin
Step 3: Creating Inventory System Script
Now we create the main inventory logic.
using System.Collections.Generic;
using UnityEngine;
public class Inventory : MonoBehaviour
{
public List<Item> items = new List<Item>();
public void AddItem(Item newItem)
{
items.Add(newItem);
Debug.Log(newItem.itemName + " added to inventory");
}
}
Explanation:
We use a List to store items
AddItem function adds new items
Debug log helps testing
Step 4: Removing Items
Now we add item removal functionality.
public void RemoveItem(Item item)
{
if (items.Contains(item))
{
items.Remove(item);
Debug.Log(item.itemName + " removed from inventory");
}
}
What this does:
- Checks if item exists
- Removes item safely
- Prevents errors
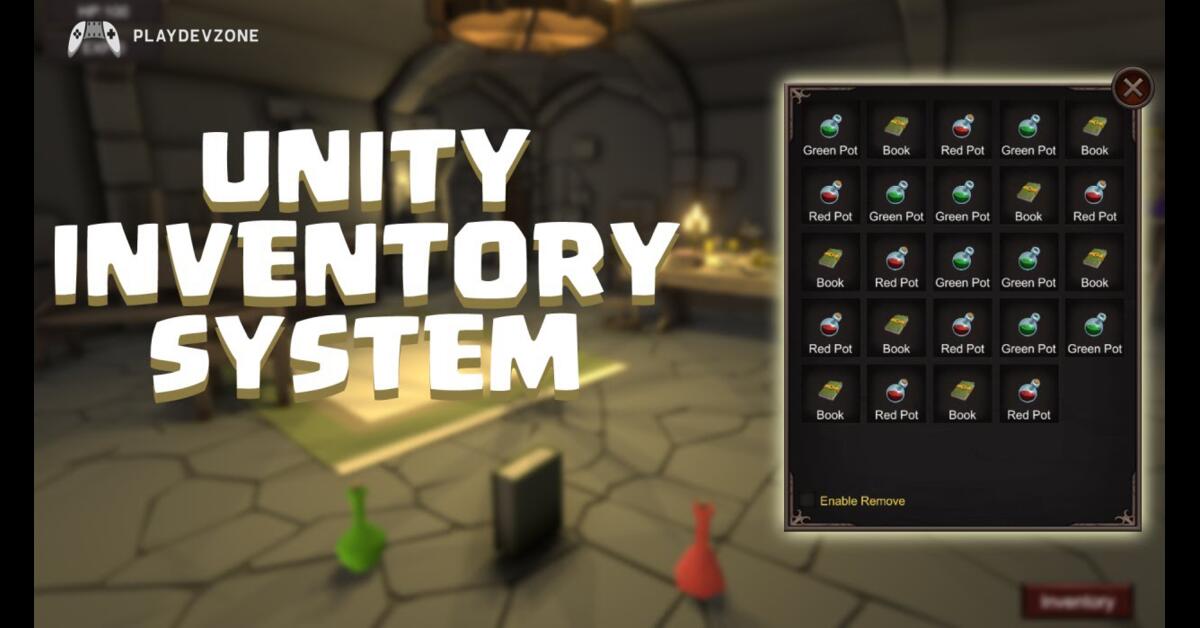
Step 5: Designing Inventory UI
Now we create UI system ( Unity 6 Inventory System Tutorial ).
Create UI Elements:
- Canvas
- Panel (Inventory Background)
- Grid Layout Group
- Slot Prefab
Slot should contain:
- Image (Item Icon)
- Text (Quantity if needed)
Step 6: Connecting UI With Inventory
Now connect UI with the system:
* Attach the Inventory script to Player.
* Create test items
* Call the AddItem function using a button or trigger.
- Example:
inventory.AddItem(testItem);
Step 7: Testing System
Now test your system:
Add items in play mode
Check UI updates
Remove items
Verify console logs
If everything works, congratulations
Common Mistakes Beginners Make
Putting all logic in Update()
Not using Scriptable Objects
Poor UI structure, not separating UI and logic
Hardcoding items instead of a dynamic system ( Unity 6 Inventory System Tutorial )
FAQ (Frequently Asked Questions)
What is the easiest way to create an inventory system in Unity 6?
The easiest way to create an inventory system in Unity 6 is to use Scriptable Objects, a List-based system, and Unity UI Grid Layout.
Scriptable Objects help you store item data like name, icon, and properties without repeating code. Lists manage collected items, while UI displays them visually.
This method is beginner-friendly, scalable, and widely used in real game development projects ( Unity 6 Inventory System Tutorial ).
Can I use this inventory system in mobile games?
Yes, this inventory system works perfectly in mobile games developed for Android and iOS. Unity 6 supports cross-platform development, so the same logic can be used on mobile devices.
However, for better performance, you may need to optimize UI elements, reduce unnecessary updates, and manage memory carefully ( Unity 6 Inventory System Tutorial ).
Mobile games often require lightweight, efficient inventory systems to ensure a smooth gameplay experience.
Is this system good for RPG games?
Yes, this inventory system is a strong foundation for RPG games. Most RPG games rely heavily on inventory systems for weapons, armor, potions, and quest items.
This basic system can later be expanded into advanced features like item rarity, equipment slots, stats system, and crafting mechanics ( Unity 6 Inventory System Tutorial ).
With proper upgrades, it can become a complete RPG inventory framework used in professional game development.
Can I add drag and drop later?
Yes, you can easily extend this inventory system with drag and drop functionality.
Unity’s UI system supports event interfaces that allow items to be moved between slots ( Unity 6 Inventory System Tutorial ).
You can also add features like item swapping, stacking, and equipment slots.
Drag and drop makes the inventory more interactive and user-friendly, especially in RPG and survival games where inventory management is a key gameplay feature.
Do I need advanced coding skills?
No, you do not need advanced coding skills to follow this Unity 6 Inventory System Tutorial.
A basic understanding of C# programming is enough. Concepts like variables, functions, and lists are sufficient to build the system ( Unity 6 Inventory System Tutorial ).
The tutorial is designed for beginners, and as you progress, you naturally learn more advanced concepts like Scriptable Objects, UI systems, and modular programming in Unity.
Conclusion
In this Unity 6 Inventory System Tutorial, you learned how to build a complete inventory system from scratch using Scriptable Objects, C# scripts, and the Unity UI system ( Unity 6 Inventory System Tutorial ).
This is one of the most important systems in game development, and mastering it will help you create professional-level games.
The best part is that this system is fully expandable. You can turn it into:
RPG inventory
Survival game system
Loot system
Mobile game inventory ( Unity 6 Inventory System Tutorial )
If you keep improving it, you will become a much stronger game developer.